Review of Assembly and Usefulness of the Harbor Freight 60in Yukon Workbench.
I just recently assembled what I would term one of my best tool purchases from the view of price, ease of assembly and usefulness since I started building up my woodworking garage workshop. This new tool is the Yukon 60″ 3 drawer Hardwood workbench.

I’ve seen this particular style of bench under different names and retailers all ranging in price from $200 to $400 in price range but when you review them they are the same banch as the one sold at Harbor Freight which at the time of me writing this is $179. I am also on their insiders list so I got a 20% off when I purchased it then when their weekly coupons came out they allowed me to apply another 20% coupon 3 days later which made my total purchase price was about $115.
Going into this purchase I was a bit skeptical and had done my full research with many YouTubers submitting reviews of the horrors of assembling this bench. One of their concerns was legitimate in regards to instructions since thyey are a bit vague but with the ability to get assembly videos online, the instructions provided actually helped clear up some items.
Unboxing
I first went through to unbox the bench and was pleasantly surprised by how well packaged it was. They had ample styrofoam protecting everything and added 1/8 inch plywood panels at both ends of the package to protect from folks who generally drag or push large boxes along the ends. They used larger pieces like the top to hold smaller pieces within its frame to protects them from bouncing around during transit. I inspected every part as I removed them (folks had mentioned cracked or scratched pieces at unboxing but I found all my parts in excellent condition.
Assembling the Workbench
I’ve built home furniture before and from the complexity shown in the images this one has a very scary appearance to its assembly. This thought couldn’t be further from the truth. Most of the major assemblies like the legs, benchtop are already assembled so the process is relatively simple and straightforward. We have 8 bolts to attach the bottom frame pieces that hold the bottom shelf, 6 screws to attach the middle drawer slides panel, and 24 screws to put the 2 drawers together.
To start I took the left and right leg assemblies on the floor upside down. I then took the back stretcher and attached it with the provided screws. These screws are a little different than normal because they have a cylindrical nut that fits into a hole in the stretcher. They have a phillips head on one side that allows you to align the opening with the direction of the screw. I found that holding the nut in place with a phillips head screw driver while I inserted the screw. This allowed me to get the screw started a little by hand and kept it from cross threading (yes, I did strip one screw but they give you 2 extras in case of this). I left all the screws loose until I had both stretchers and the bottom shelf in place. Once the back rail is started I inserted the bottom shelf into the slot cut to hold it then put the from rail over the shelf and screwed into place. Again this was an area many mentioned online where the shelf didn’t fit the slot or one of the rails was shorter than the other but none of this was an issue. At this stage I tighened the screws done tight enough so the shelf wouldn’t fall out.
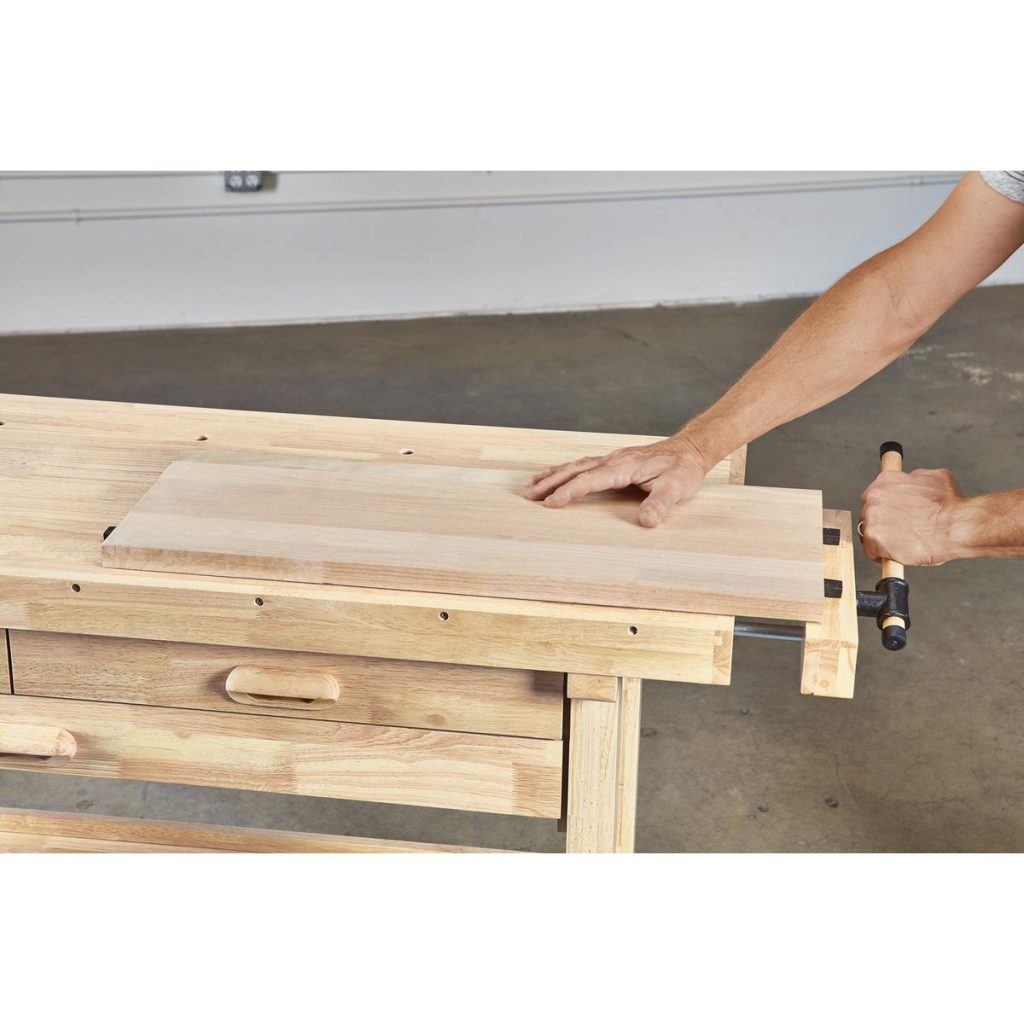
Next step was to put the parts for the benchtop together. This entailed the adding of the center panel for the shelf slides and the side vice. The center panel has 2 dowels already installed and you just need to place the dowels in the panel assembly into the holed in the benchtop underside. When installing this panel make sure the the front of the slide open towards the front of the bench. I then removed the screw and washer from the screw part of the vice and got it started in the 3 holes provided on the right side of the benchtop. Make sure the 2 square holes for the pegs are facing up (top of workbench) when installing. Screw the vice handle clockwise until the vice is fully inserted into the assembly then replace the screw and washer to prevent the screw from coming all the way out of the assembly when opening.
Place the assembled benchtop onto the ground with the underside facing up. Take the leg assembly and place it on top of the benchtop aligning the 3 screw holes on the top part of the legs with the screw holes on the table top. Insert the screws and and wiggle the legs to let the points settle into the pre-drilled holes. Begin tightening the screws but go slow and don’t tighten the screws all the way. Leave them loose until you have inserted the drawers then tighten up all the screws for the entire bench. Lastly I installed the stretcher that goes up across the left and right slide panels to keep the bench supported in the middle.
The final part of the assembly was to build the 3 drawers and place them into bench assembly. This was another area where I heard horror stories from other assemblers but the drawers were all very simple to assemble and fit nicely into the draw slides. I did use a clamp to hold the slide mechanisms from the bench assemblies out several inches from the workbench make it easier to start the drawers and prevent the binding issue others have mentioned. After installing the drawers I tightened all the screws to made the bench secure and sturdy.
Final thoughts
Overall the assembly of this bench was very easy and straightforward. I did have the benefit of several youtube videos that helped with assembly and showed potential pitfalls so I was fully prepared. Except for the one stripped screw everything went together very easy, all pieces lined up and I didn’t have to make any modifications to the bench for fit. I did add a set of retractable wheels to the legs so I can move it around the shop but can set it down on the nfloor as a stable platform t work on.
At a price point of $179 this bench is a steal, with Harbor Freight discounts added on the my price was mind boggling. The bench is very sturdy and solidly built. I foresee it being a major part of my workshop for many years to come.
There is one thing I might add here though is the top has 2 drawbacks first theys placed a frame around the bench top that deceivingly makes it appear as though the benchtop is about 3 or 4 inches thick but the actual top is maybe a little over an inch. Not a deal breaker as the top is still plenty strong enough but this makes it hard if you needed to clamp something to the edge of the top. You can easily rip down some 2×4’s and glue them under the top along the trim to provide a good clamping service. The last thing is if you and using the vice to hold something directly in the jaws and are only placing the item to the left or right of the jaw surface the vice will skew towards the end no having any material on its side. You can make some small blanks of various size woods, glue some plywood tops to them so they don’t fall through the vice to compensate for this.
Overall it took we less that 2 hours from unboxing to complete assembly of this bench so this debunks several other assemblers claims of being a long assembly time.